LLM智能应用开发

第4讲: 大语言模型解析 I
基于HF LlaMA实现的讲解

Input/Positional Embedding

LLM结构的学习路径

  • LLM结构解析(开源LlaMA)
  • 自定义数据集构造
  • 自定义损失函数和模型训练/微调

Transformer经典结构

  • Encoder-decoder结构
  • 输入部分
    • Input embedding
    • Positional embedding
  • Transformer部分
    • Attention
    • Feed forward

LlaMA的模型结构

center

HF LlaMA模型结构

LlamaForCausalLM(
  (model): LlamaModel(
    (embed_tokens): Embedding(128256, 2048)
    (layers): ModuleList(
      (0-15): 16 x LlamaDecoderLayer(
        (self_attn): LlamaAttention
        (mlp): LlamaMLP
        (input_layernorm): LlamaRMSNorm
        (post_attention_layernorm): LlamaRMSNorm
    )
    (norm): LlamaRMSNorm((2048,), eps=1e-05)
    (rotary_emb): LlamaRotaryEmbedding()
  )
  (lm_head): Linear(in_features=2048, out_features=128256, bias=False)
)

LlamaDecoderLayer内部结构

(self_attn): LlamaAttention(
  (q_proj): Linear(in_features=2048, out_features=2048, bias=False)
  (k_proj): Linear(in_features=2048, out_features=512, bias=False)
  (v_proj): Linear(in_features=2048, out_features=512, bias=False)
  (o_proj): Linear(in_features=2048, out_features=2048, bias=False)
  (rotary_emb): LlamaRotaryEmbedding()
)
(mlp): LlamaMLP(
  (gate_proj): Linear(in_features=2048, out_features=8192, bias=False)
  (up_proj): Linear(in_features=2048, out_features=8192, bias=False)
  (down_proj): Linear(in_features=8192, out_features=2048, bias=False)
  (act_fn): SiLU()
)
(input_layernorm): LlamaRMSNorm((2048,), eps=1e-05)
(post_attention_layernorm): LlamaRMSNorm((2048,), eps=1e-05)

Qwen3-0.6B模型结构

Qwen3ForCausalLM(
  (model): Qwen3Model(
    (embed_tokens): Embedding(151936, 1024)
    (layers): ModuleList(
      (0-27): 28 x Qwen3DecoderLayer(
        (self_attn): Qwen3Attention()
        (mlp): Qwen3MLP()
        (input_layernorm): Qwen3RMSNorm((1024,), eps=1e-06)
        (post_attention_layernorm): Qwen3RMSNorm((1024,), eps=1e-06)
      )
    )
    (norm): Qwen3RMSNorm((1024,), eps=1e-06)
    (rotary_emb): Qwen3RotaryEmbedding()
  )
  (lm_head): Linear(in_features=1024, out_features=151936, bias=False)
)

Qwen3Attention内部结构

(q_proj): Linear(in_features=1024, out_features=2048, bias=False)
(k_proj): Linear(in_features=1024, out_features=1024, bias=False)
(v_proj): Linear(in_features=1024, out_features=1024, bias=False)
(o_proj): Linear(in_features=2048, out_features=1024, bias=False)
(q_norm): Qwen3RMSNorm((128,), eps=1e-06)
(k_norm): Qwen3RMSNorm((128,), eps=1e-06)

Qwen3MLP内部结构

(gate_proj): Linear(in_features=1024, out_features=3072, bias=False)
(up_proj): Linear(in_features=1024, out_features=3072, bias=False)
(down_proj): Linear(in_features=3072, out_features=1024, bias=False)
(act_fn): SiLU()

本次课程关注

  • 目前,流行结构多为Decoder-only
  • 输入部分
    • Input embedding
    • Positional embedding
  • Transformer部分
    • Attention
    • Feed forward

Input embedding

(embed_tokens): Embedding(128256, 2048)
  • embedding:将自然语言翻译为index
  • 每个index对应一个embedding
    • embedding需训练
  • 例如:
    • 用户给LLM的输入: "你好,请介绍下南京大学"
    • LLM经过预训练的embedding: [[0.2234234,-0.28178,...], [...]]
翻译过程:一般由tokenizer实现

Input embedding原理

"语言是文明的载体,对人类而言是这样,对LLM而言也是这样"

这是"南京大学"
center

Input embedding原理

这也是"南京大学"

center

Input embedding原理

这也是“南京大学”:南大的(部分)特征

Input embedding原理

Input embedding:构建表达自然语言特征表示 (representation)

为LLM构建词汇表

  • 自然语言是离散的,LLM词汇表依然延续离散的模式构建
  • 如何分词: 'Hello, world!'
    • word-based: | hello | , | world | ! |
    • character-based: h|e|l|l|o|,|w|o|r|l|d|!
    • subword-based tokenization
      • 基本原则:常用“词”不拆分,一般词分解为有意义的子词(subword)
      • 来试试Tiktokenizer

Tokenization方式

  • Byte-level BPE (GPT2)

  • WordPiece (BERT)

  • SentencePiece (Multilingual models)

  • Tokenizer in LlaMA3

来试试LlaMA3的Tokenizer

一般每个LLM会自带tokenizer,用以下方式加载模型对应的tokenizer

from transformers import AutoTokenizer
tokenizer = AutoTokenizer.from_pretrained(model_id)
  • 使用方法
    • tokenizer(input) - 完整编码,返回字典
    • tokenizer.tokenize(input) - 只分词,返回字符串列表
    • tokenizer.encode(input) - 编码为ID,可选择特殊符号
    • tokenizer.decode(input) - 解码ID为文本

Tokenizer方法详解

1. tokenize() - 分词方法

text = "南京大学是一所优秀的大学"
tokens = tokenizer.tokenize(text)
print(tokens)  # ['南', '京', '大', '学', '是', '一', '所', '优', '秀', '的', '大', '学']
  • 只做分词,不添加特殊符号
  • 返回字符串token列表
  • 用于查看分词效果

2. encode() - 编码方法

# 不添加特殊符号
ids = tokenizer.encode(text, add_special_tokens=False)
print(ids)  # [59563, 47653, 102667, ...]

# 添加特殊符号(默认)
ids_with_special = tokenizer.encode(text, add_special_tokens=True)
print(ids_with_special)  # [128000, 59563, 47653, ..., 128001]
  • 将文本转换为token ID
  • add_special_tokens=True:添加BOS/EOS等特殊符号
  • 返回整数列表

3. tokenizer() - 完整编码方法

encoded = tokenizer(text)
print(encoded)
# {'input_ids': [128000, 59563, 47653, 102667, 128001], 
#  'attention_mask': [1, 1, 1, 1, 1]}
  • 返回包含input_idsattention_mask的字典
  • 支持批量处理、padding、truncation等参数
  • 最常用的方法

4. decode() - 解码方法

decoded = tokenizer.decode(encoded['input_ids'])
print(decoded)  # "南京大学是一所优秀的大学"

# 跳过特殊符号
decoded_clean = tokenizer.decode(encoded['input_ids'], skip_special_tokens=True)
print(decoded_clean)  # "南京大学是一所优秀的大学"
  • 将token ID转换回文本
  • skip_special_tokens=True:去除特殊符号

5. 批量处理

texts = ["你好", "南京大学", "人工智能"]
batch_encoded = tokenizer(texts, padding=True, truncation=True, return_tensors="pt")
print(batch_encoded['input_ids'].shape)  # torch.Size([3, max_length])

位置编码 (Positional embeddings)

位置编码:用来标记每个词的位置

  • Sinusoidal PE
    • Attention is all you need时代的位置编码
  • Rotary PE(旋转位置编码)

位置编码的初衷

  • Attention模块计算的是每个token的注意力分数
    • 衡量token与token之间的相关性
  • 位置编码用来标记每个token的位置
    • 让LLM更好的建模不同位置的token之间的关系

绝对位置编码

直接在每个token的embedding上线性叠加位置编码: ,其中为可训练的向量

Sinusoidal PE: Attention is all you need

center

灵感来源:通过周期性建模位置编码

位置编码与序数编码的关联

  • 序数表示次序,位置编码的用意也在于此。例如从小就学的序数编码:
    • 十进制: 1 2 3 4 5 6 7 8 9 10, ...
    • 二进制: 0, 1, 10, 11, 100, 101, 110, 111, 1000, 1001, ...
  • 但是
    • LLM中的token embedding为向量,如何构造型为向量的位置编码?

序数的周期性

十进制本身是周期性的,二进制也是周期性的
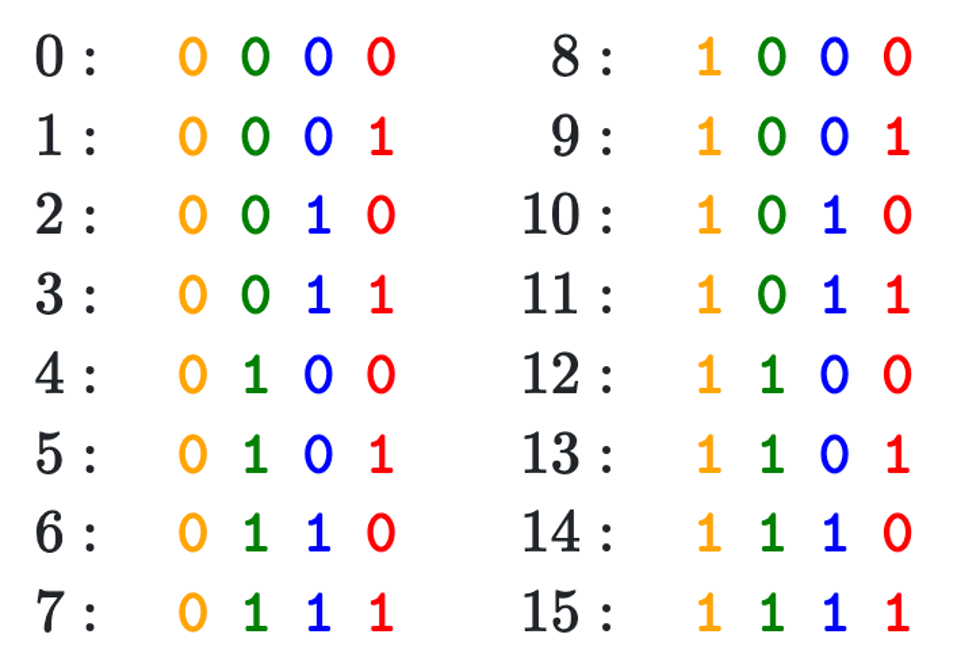
center

Sinusodial PE

构建n维的位置编码,每一维用不同的周期函数刻画取值
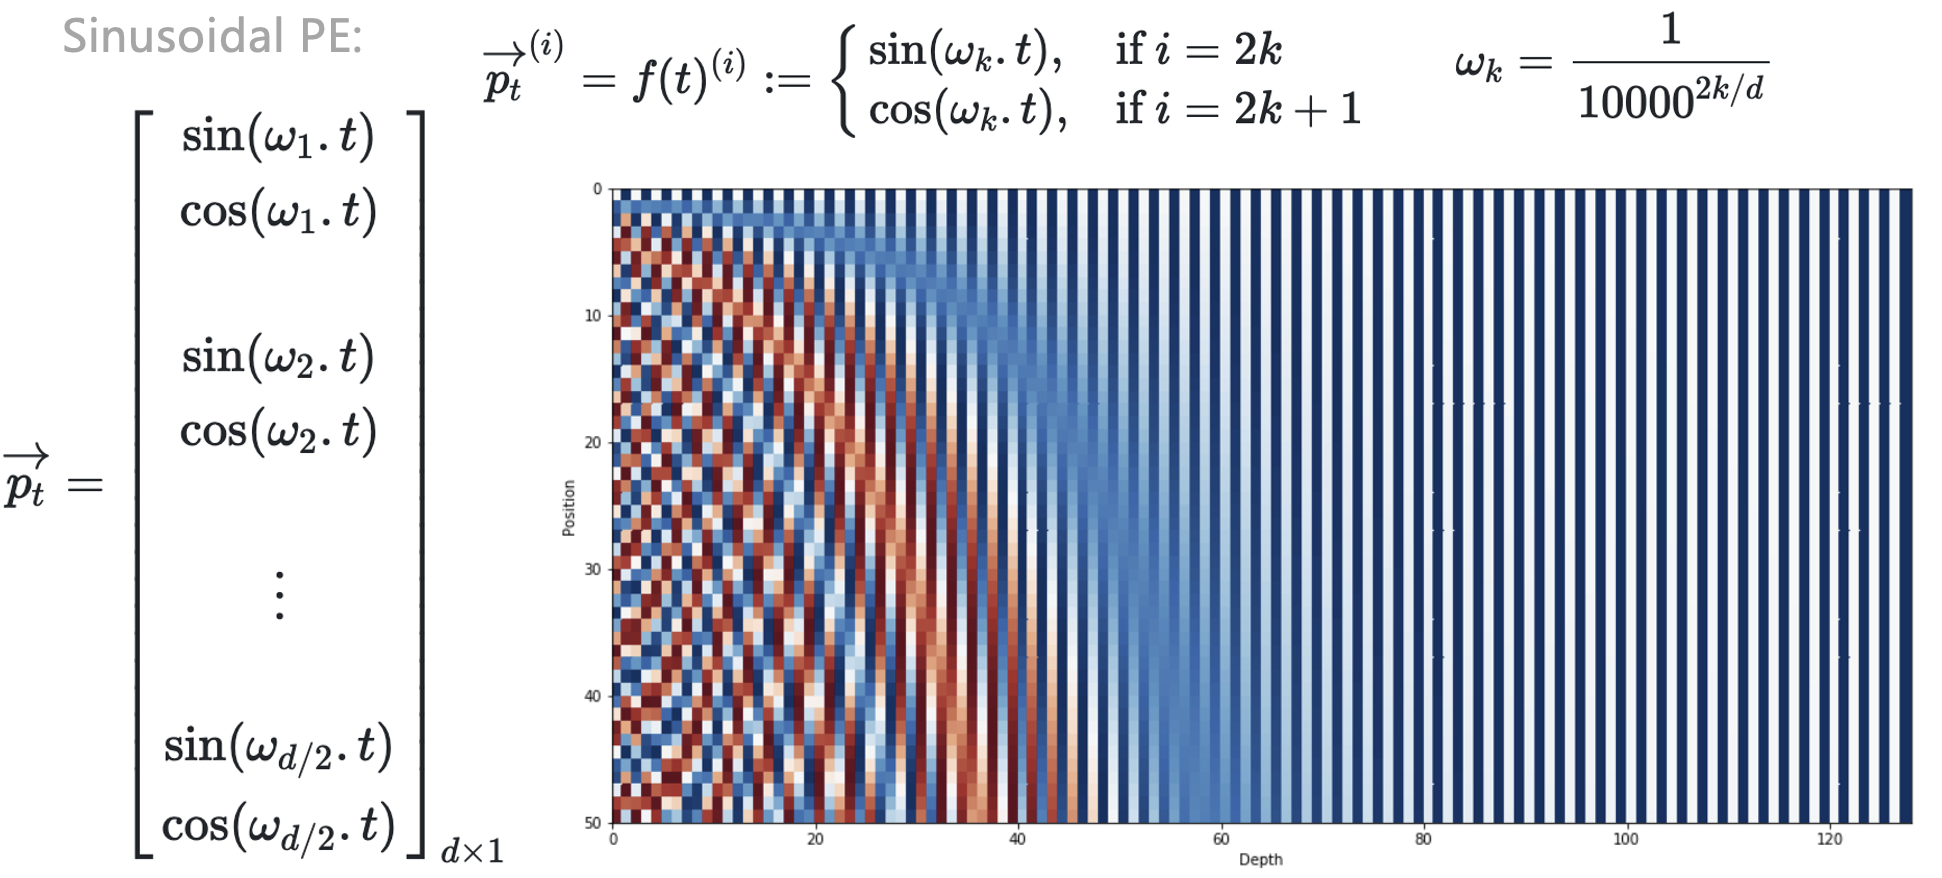
center

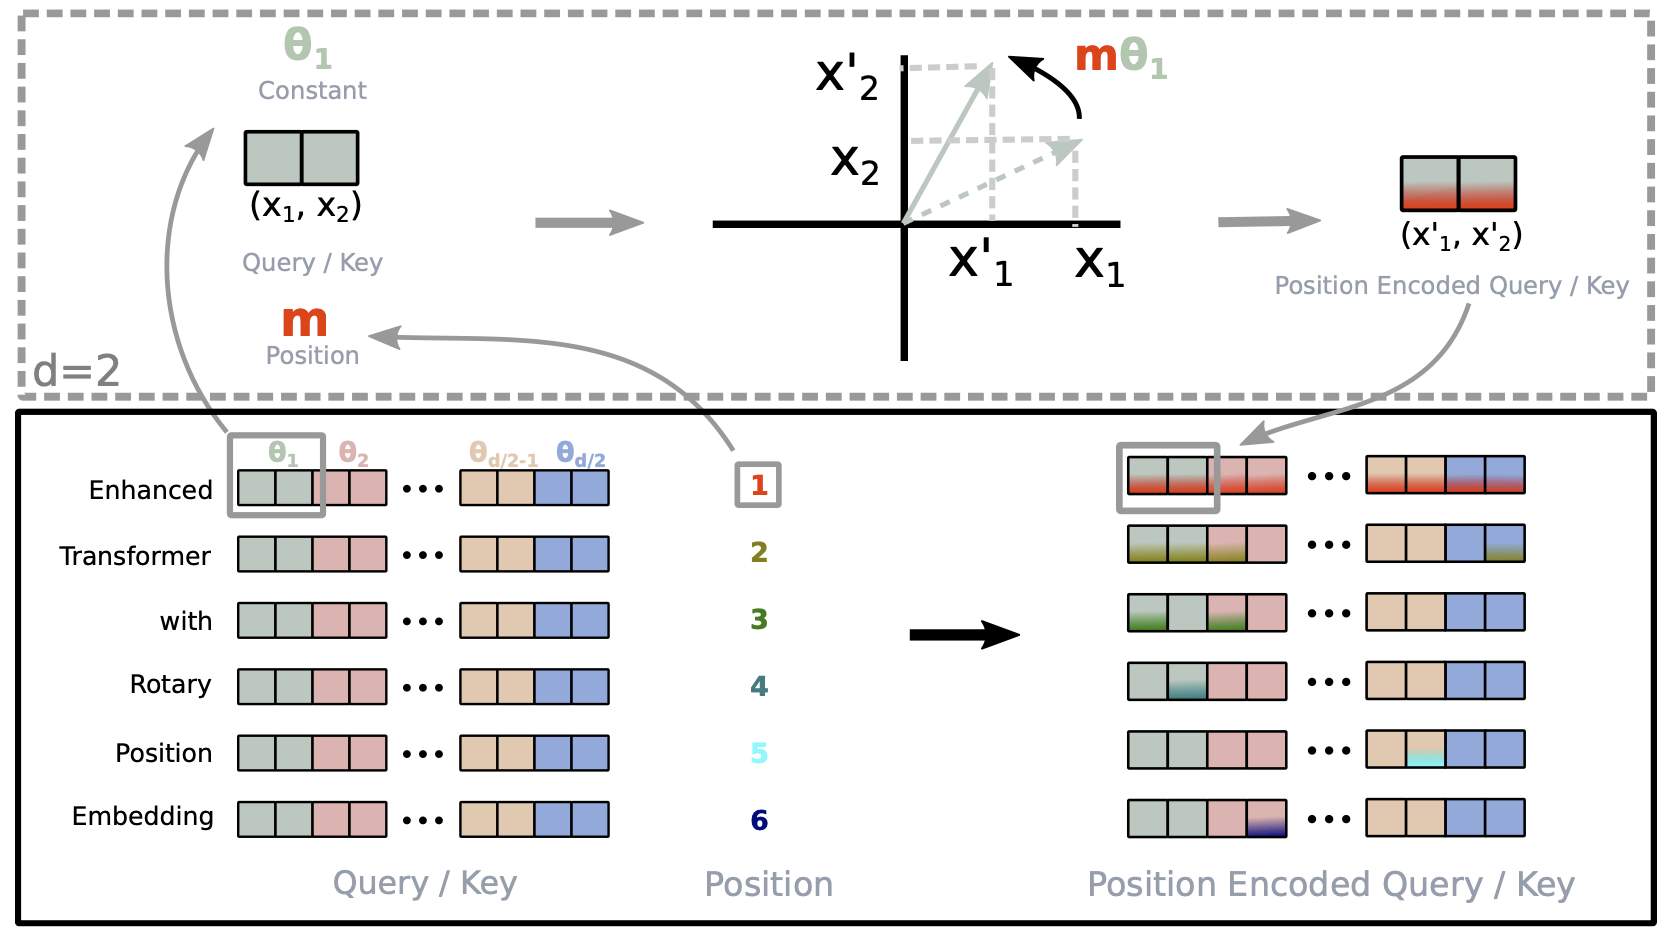
旋转位置编码(Rotary PE)

“叠加旋转位置编码的方式由加法改乘法”

假设两个token的embedding为分别代表两个token的位置,目标找到一个等价的位置编码方式,使得下述等式成立:
center

RoFormer提出Rotary PE,在embedding维度为2的情况下:
center

Rotary PE的2D理解

回忆下欧拉公式:

center

因此,上述函数中的指数函数具体表示为
center

RoPE实现

RoPE的2D实现
center

RoPE的n维实现
center

Rotary PE的可视化展示

center

RoPE在LlaMA中的构建

不同于经典Transformers结构,只对输入的token做位置编码的叠加

LlaMA中的RoPE在Transformer的每一层都会对Q和K进行位置编码的叠加

补充内容:PyTorch Tensor操作详解

在深度学习中,tensor操作是构建模型的基础。理解各种tensor操作对于实现LLM等复杂模型至关重要。

Tensor操作分类

  • 形状变换操作
    • view() / reshape() - 改变tensor形状
    • transpose() / permute() - 转置和维度重排
    • squeeze() / unsqueeze() - 压缩/扩展维度
  • 数学运算操作
    • matmul() / @ - 矩阵乘法
    • bmm() - 批量矩阵乘法
    • einsum() - 爱因斯坦求和约定
  • 存储连续:contiguous()

Tensor操作分类

  • 索引和切片操作
    • gather() / scatter() - 按索引收集/分散
    • index_select() - 按索引选择
    • masked_select() - 按掩码选择

形状变换操作:view vs reshape

基本原理

  • view(): 返回与原tensor共享存储的新视图,要求tensor在内存中连续
  • reshape(): 如果可能则返回view,否则返回副本

代码示例

# view() - 要求tensor连续
x = torch.randn(2, 3, 4)
y = x.view(6, 4)  # 成功:2*3=6

# 如果tensor不连续,view()会报错
x_transposed = x.transpose(0, 1)  # 不连续
# y = x_transposed.view(12, 2)  # 报错!

# reshape() - 自动处理连续性问题
y = x_transposed.reshape(12, 2)  # 成功:自动处理

转置操作:transpose vs permute

transpose() - 交换两个维度

x = torch.randn(2, 3, 4, 5)
y = x.transpose(1, 3)  # 交换维度1和3
print(x.shape)  # torch.Size([2, 3, 4, 5])
print(y.shape)  # torch.Size([2, 5, 4, 3])

permute() - 重新排列所有维度

x = torch.randn(2, 3, 4, 5)
y = x.permute(0, 3, 1, 2)  # 重新排列维度
print(x.shape)  # torch.Size([2, 3, 4, 5])
print(y.shape)  # torch.Size([2, 5, 3, 4])

维度操作:squeeze vs unsqueeze

squeeze() - 移除大小为1的维度

x = torch.randn(1, 3, 1, 4)
y = x.squeeze()  # 移除所有大小为1的维度
z = x.squeeze(0)  # 只移除第0维
print(x.shape)  # torch.Size([1, 3, 1, 4])
print(y.shape)  # torch.Size([3, 4])
print(z.shape)  # torch.Size([3, 1, 4])

维度操作:squeeze vs unsqueeze

unsqueeze() - 在指定位置插入大小为1的维度

x = torch.randn(3, 4)
y = x.unsqueeze(0)  # 在第0维插入
z = x.unsqueeze(-1)  # 在最后一维插入
print(x.shape)  # torch.Size([3, 4])
print(y.shape)  # torch.Size([1, 3, 4])
print(z.shape)  # torch.Size([3, 4, 1])

Broadcasting(广播)机制

Broadcasting是PyTorch中一种强大的机制,允许不同形状的tensor进行运算。它遵循以下规则:

  1. 从右向左对齐维度:从最后一个维度开始比较
  2. 维度兼容性:两个维度要么相等,要么其中一个为1,要么其中一个不存在
  3. 自动扩展:较小的tensor会在不兼容的维度上自动扩展

Broadcasting规则示例

# 示例1: 标量与tensor
a = torch.tensor([1, 2, 3])
b = 2
c = a + b  # [3, 4, 5] - 标量自动广播到每个元素

# 示例2: 不同形状的tensor
A = torch.randn(3, 4)      # [3, 4]
B = torch.randn(4)         # [4]
C = A + B                  # [3, 4] - B自动扩展为[1, 4]然后[3, 4]

# 示例3: 更复杂的广播
A = torch.randn(2, 3, 4)   # [2, 3, 4]
B = torch.randn(3, 1)      # [3, 1]
C = A + B                  # [2, 3, 4] - B扩展为[1, 3, 1]然后[2, 3, 4]

Broadcasting在深度学习中的应用

# 1. 添加偏置项
x = torch.randn(32, 128)  # [batch_size, features]
bias = torch.randn(128)   # [features]
y = x + bias              # 每个样本都加上相同的偏置

# 2. 注意力机制中的mask
scores = torch.randn(2, 8, 8)  # [batch, seq_len, seq_len]
mask = torch.tensor([1, 1, 1, 0, 0, 0, 0, 0])  # [seq_len]
masked_scores = scores + mask.unsqueeze(0).unsqueeze(0)  # 广播到[2, 8, 8]

# 3. 批量归一化
x = torch.randn(32, 64, 28, 28)  # [batch, channels, height, width]
mean = torch.mean(x, dim=(0, 2, 3), keepdim=True)  # [1, 64, 1, 1]
normalized = (x - mean) / torch.std(x, dim=(0, 2, 3), keepdim=True)

矩阵乘法操作

不同矩阵乘法的使用场景

  • torch.matmul() / @: 通用矩阵乘法,支持广播
  • torch.bmm(): 批量矩阵乘法,专门用于3D tensor
  • torch.mm(): 2D矩阵乘法
# 批量矩阵乘法
A_batch = torch.randn(2, 3, 4)
B_batch = torch.randn(2, 4, 5)
C_batch = torch.bmm(A_batch, B_batch)
print(C_batch.shape)  # torch.Size([2, 3, 5])

爱因斯坦求和约定 (einsum)

einsum提供了一种简洁的方式来表达复杂的tensor操作:

# 矩阵乘法: C[i,j] = sum_k A[i,k] * B[k,j]
A = torch.randn(3, 4)
B = torch.randn(4, 5)
C = torch.einsum('ik,kj->ij', A, B)
# 批量矩阵乘法
A_batch = torch.randn(2, 3, 4)
B_batch = torch.randn(2, 4, 5)
C_batch = torch.einsum('bik,bkj->bij', A_batch, B_batch)
# 注意力机制中的QK^T计算
Q = torch.randn(2, 8, 64)  # [batch, seq_len, d_model]
K = torch.randn(2, 8, 64)
scores = torch.einsum('bqd,bkd->bqk', Q, K)

索引和选择操作

gather() - 按索引收集元素

# 在指定维度上按索引收集元素
x = torch.randn(3, 4)
indices = torch.tensor([0, 2, 1])
y = torch.gather(x, 1, indices.unsqueeze(1))
print(x)
print(y)  # 每行按indices选择元素

scatter() - 按索引分散元素

# 将元素分散到指定位置
x = torch.zeros(3, 4)
values = torch.randn(3, 2)
indices = torch.tensor([[0, 2], [1, 3], [0, 1]])
x.scatter_(1, indices, values)
print(x)

拓展阅读&参考文档

Hugging Face
Accelerating a Hugging Face Llama 2 and Llama 3 models with Transformer Engine

RoPE部分
Transformer升级之路:10、RoPE是一种β进制编码. 苏剑林
RoFormer: Enhanced Transformer with Rotary Position Embedding

PyTorch Tensor操作
PyTorch官方文档 - Tensor操作
Einops库 - 更优雅的tensor操作

https://marp.app/

<p align="center"> <img width="500" height="200" src="images/l4/nju.png"> <img width="500" height="200" src="images/l4/nju2.png"> </p>

![w:800 center](../images/2025/l4/tensor_operations_simple.png)

![w:800 center](../images/2025/l4/broadcasting_diagram.png)